

How To Clean Between Coats Of Polyurethane
Desire a glass-smooth wood end? The video and article below are ane of my most popular, and you'll be amazed by what you lot tin can accomplish with this forest finishing technique. More than than 1,000,000 people have given this video a 95% approval rating. Don't miss the article below, besides.
 Did you find this video helpful? I'yard Steve Maxwell, and I create all the content on this website. It would aid me if you'd consider contributing to my piece of work by "ownership me a coffee" via the push below. A few dollars make a big difference. Cheers!
By the time y'all finish reading this article and watch the videos here you lot'll know exactly how to create a glass-polish clear stop on wood, even if you're only using a pigment castor to apply urethane.It sounds too good to be true, but it is true. If y'all pay attention and go the details right, you'll be one of those people who tin can utilise a actually nifty stop on interior forest, and do it every time. It all comes down to an functioning chosen "buffing".
Why is Polyurethane Finish Buffing So Effective?
Buffing wood is the best-kept undercover of the forest finishing world. What surprises me is how few woodworkers know about it considering how often people have trouble creating a wood terminate they tin can exist proud of. Buffing can create a drinking glass-smooth terminate, fifty-fifty afterwards polyurethane has been practical not-too-well with zip more a castor in an ordinary dwelling workshop. Buffing is particularly valuable for dealing with the nasty side of waterbased urethane – the brush strokes, the bubbles and the less-than-smoothen results many people struggle against. The dirty little underground of the forest finishing globe is that waterbased urethane is significantly harder to employ well than its oil-based antecedent. Buffing really does brand information technology easy to get superb results on wood finished with polyurethane, even waterbased. That's what you'll learn nigh hither. Buffing works beautifully, even if you've applied a finish that'southward not likewise shine to begin with.
Most ordinary people who attempt to use a polyurethane finish eventually resign themselves to sub-standard results, all for lack of one tiny piece of information. Merely a rough, dull wood finishing outcome isn't inevitable when you empathize how to do ability buffing. It works perfectly on all flat wooden surfaces, making use of the ubiquitous random orbit sander power tool. I'm not talking almost using this sander for sanding, but rather for buffing a cease that yous've already applied.
How to Buff Polyurethane Finishes
You tin power-vitrify all kinds of finishes – wood, metal, and even car bodies. When y'all get to the bottom of this article, check out my video on how I used buffing techniques to become rid of scuffs and scratches on my vehicles. In this article I'll show you lot how it applies here to a polyurethane wood end – either oil-based or water based. Buffing tin can transform an ordinary forest surface into 1 that's as smooth as glass and very inviting to the bear on. And the work takes just a few minutes. Click the video window above to watch an overview of the ability buffing process.
Before you practice annihilation else on an bodily project, read and understand all the steps beneath.
Polyurethane Finish Step#one: Offset With a Thick Coating
The starting time thing to empathise is the demand to begin with a thick polyurethane finish motion-picture show to ensure that you don't buff right through to blank wood. That's non to say you should apply each coat thickly. Iv regular coats of urethane practical one over the other is a good starting point. Sand lightly with 240-grit sandpaper betwixt coats, then let the last coat dry for at to the lowest degree 24 hours. This is standard practice with whatever wood finishing chore, and is nothing out of the ordinary. That said, sanding bare wood beforehand to create a smooth foundation is fundamental. Click to watch the video on the right to meet how I've been sanding wood as a professional cabinetmaker since the mid-1980s.
Although buffing makes whatsoever blazon of urethane look and experience like glass, might as well utilize a formulations that's as easy equally possible to succeed with. Click here for details of the best urethane I've used from the options available now.
Polyurethane Finish Step#2: Level the Surface of the Finish
At this phase y'all'll accept an acceptable surface, but one that'southward probably marred past tiny bumps caused past dust that settled on the cease as information technology dried. This is why leveling is the pre-buffing footstep required next. Start with one of the former pieces of the 240-grit sandpaper y'all used to sand between coats earlier, so wrap it around a block of Styrofoam and rub the wood surface lightly in the same direction as the grain. Used sandpaper is best because it'south gentle. It only takes a few strokes to remove the grit bumps, so don't overdo information technology. Also, be certain to avoid fresh sandpaper for this task because it cuts too aggressively. You lot definitely don't want to go right through the end to bare woods. Similar I said, employ a slice of old 240-dust sandpaper left over from the sanding you did between coats of urethane.
Later on just a few strokes y'all'll observe that the surface feels noticeably smoother correct after de-bumping, though the sheen volition be irregular to the heart. Information technology will be dull where the sandpaper did most of its work, and shinier where information technology did less. This is normal. As long every bit the surface feels perfectly smooth, information technology's time to movement on to the next footstep.
Polyurethane Terminate Footstep#three: Power Buffing the Levelled Surface
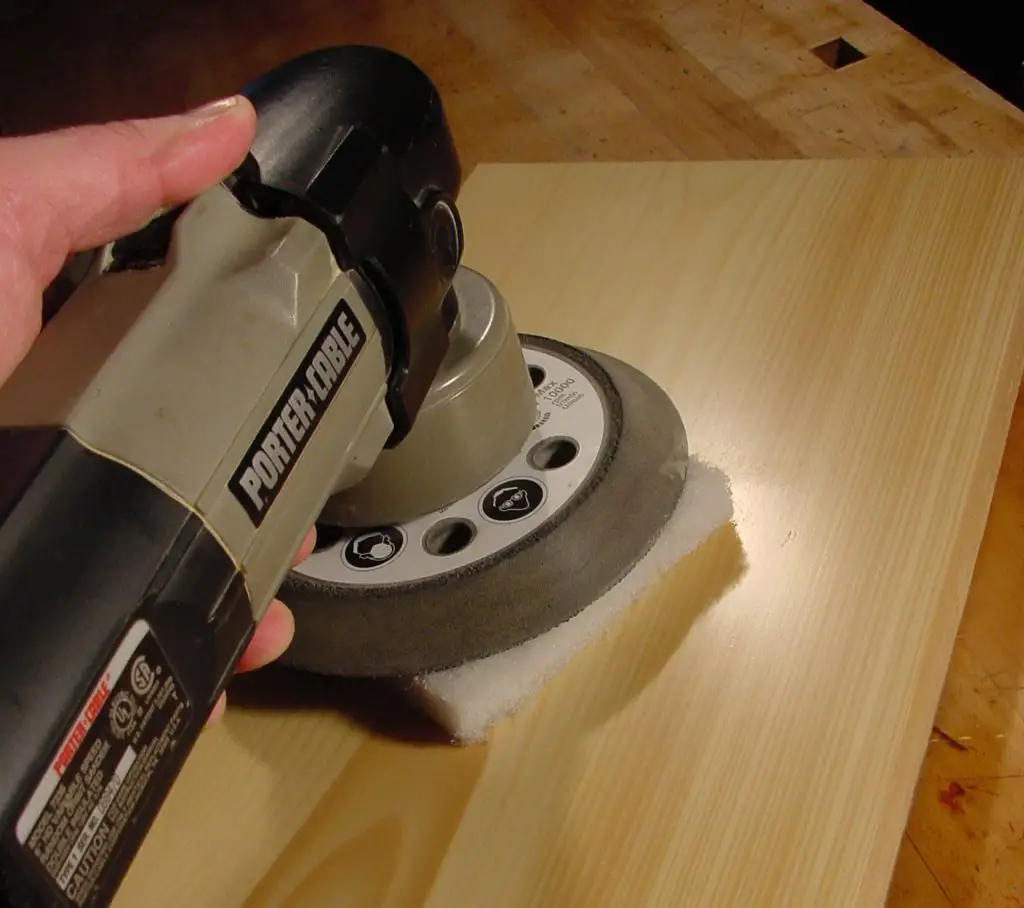
Now comes the fun. It's time to power buff. Take hold of your random orbit sander and a piece of superfine 3M rubbing pad. This is a thick, not-woven, constructed abrasive material available at woodworking outlets and better hardware stores. It comes in different annoying ratings, and the superfine type is what you demand (information technology's ordinarily white in color). I buy mine past mail service order. Cut a 6-inch x 6-inch slice, identify it on your projection, then put your sander on superlative. Switch on the power. As the vibrations and rotations of the tool are transmitted to the pad and the wood, it buffs the surface, removing tiny imperfections while leveling out the sheen beautifully. Work over the whole area evenly and slowly in a filigree blueprint. A bright light reflecting off the surface at a shallow angle is the best way to highlight areas that need more work. The more you shine, the shinier the results.
You won't exist able to get a sander into every nook and cranny, and that'southward why you should prefinish parts as often as possible before associates. You lot can as well extend the reach of the buffing treatment using the rubbing pad by hand. You'll notice that the process also works on curved surfaces and trim if you use #0000 steel wool. This ultra-fine abrasive is first-class for buffing, but there'due south a danger. Even though information technology's metallic, fine steel wool can grab burn down and burn easily. Store information technology in a tightly-sealed metal can for safety. Stop upwardly with a coat of paste wax, also buffed out under ability, and y'all'll take the smoothest possible finish that tin exist put on wood. You won't exist able to resist running your paw over it.
Want to come across buffing in action? Click to sentinel the video tutorial above. The transcript of this video sits beneath. Too, at that place'south some other video further downwards that explains how to utilise buffing to restore an car finish, and the Q&A section.
VIDEO TRANSCRIPT: One of the biggest challenges of woodworking is finishing. It's sometimes a lot easier to build a skilful projection until you get to the finishing part, and that'due south where disappointment often sets in. This is especially true if y'all're working in a dwelling shop and you're applying a polyurethane finish with a brush. I want to show you a technique here that will allow you lot to produce glass-smooth finishes without spray equipment, just using an ordinary brush and polyurethane end. Now you need to kickoff with a finish of sufficient thickness, and so that would exist at least three coats of polyurethane, and preferably iv. The trouble at this stage is that your surface is probably going to accept petty bumps on it from dust particles that have settled out from the air. There may be some brush marks besides, and these are the things that would brand the finish ugly. These are the things that I'm going to show y'all how to remove afterward the fact.
It all comes down to the right kind of chafe. So what you lot want to begin with is a piece of fine sandpaper. This is 320 grit, and it's wrapped around a piece of cream. This could be styrofoam. This is a fiddling squishier than styrofoam. Y'all don't desire to wrap it around a wooden block. You want something with a little flake of resilience, but you don't want to use the sandpaper by mitt. Now this sample here has four coats of water-based urethane, and the first pace involves knocking off the dust bumps. So, you're just drawing this back and forth across the surface like this.
You're not trying to remove significant amounts of polyurethane, simply to knock off those piddling high spots. Yous want to knock off the mountains, and you're going to know if you've washed that sufficiently with your fingertips. A niggling bit of motion of this sanding block with paper on it is going to yield a much smoother terminate. Yous'll feel the departure immediately. Information technology'due south going to be smooth, but it's not going to accept an even sheen. Where more chafe happened, it'south going to be dull; and where less abrasion happened it's going to be shinier.
Further refining the surface is what happens adjacent, and that'due south where something like this comes in. This is a 3M rubbing pad, then it'southward not-woven. This is the fine grit, and you want to use this, believe it or not, in conjunction with a random orbit sander with no abrasive disc on it. So, the sander causes the rubbing pad to move and polishes the surface. Now if you desire a matte polyurethane cease or something with just a little bit of gloss to information technology, and then all yous need to use is this fine pad. It'll smoothen things out and requite yous just the tiniest little bit of sheen. If you desire something shinier, you'd follow this up with the super fine pad used in the same mode.
This is what information technology looks like. It's really pretty elementary. You can plough the speed of your sander down a little bit, at to the lowest degree at the first until you lot go the hang of information technology. I'll merely switch on and kickoff the buffing. Now this is a very flat sheen, and so y'all're non going to see some reflections off of information technology, but it is extremely smooth. Information technology simply feels like a piece of glass, and it didn't commencement off that fashion. Now if you want it a little bit shinier, you can continue with the power buffing using this ultrafine pad. Now it feels virtually the same, just y'all can see some shinier reflections at that place. It tin become even shinier if you lot vitrify more than. You lot'd have quite a bit of control over the level of sheen that you can achieve.
Now not every woodworking situation is as nice and apartment and open as this sample slice I'one thousand showing you hither now, but the same process can be used on any kind of shape or profile. Y'all can start with the knocking off of the dust bumps, and the merely departure is that you lot don't use the random orbit sander for buffing. You simply do all the work past hand, and these are flexible plenty that they can go around contours and along the edges of panels where they meet stiles and rails, so you tin become this kind of effect on whatever surface y'all might be dealing with.
++++++++++++++++++
Got some scratches on your car or truck? Buffing might be able to help with that, besides. Click below to watch how I utilise the process successfully, including the kind of rubbing compound that makes it piece of work. Transcript beneath.
VIDEO TRANSCRIPT: 00:08 Many times, when my wife heads into the city with the van hither, we come dorsum with some damage. Nosotros don't know how this particular scuff happened here, must accept happened in some parking lot or something, but I'm going to try something to make this wait ameliorate. I mean, this is not a new vehicle. It's a 2004, but I believe in keeping vehicles good for the long haul, and that means little repairs and fix ups like this if you want to keep alee of things.
00:37 And so, what I'yard going to do is I'grand going to wash this area to get off any road grit. And and so, I'thou going to employ a buffing pad on a random orbit sander with some automotive rubbing compound. I'm thinking that this is really, I'm hoping anyway that this is on the surface, that this hasn't really effected the paint. So, I'm going endeavor the balmy abrasion of the rubbing compound and hope I tin can get rid of this white stuff. If I tin can't, and I actually don't know what I'm gonna come across yet, I'm gonna continue. I take some color matched pigment for the van here, and I'm going to prove you how I would paint over damage similar this with paint and clear coat, and then buffing to blend the repair into the surrounding areas.
01:24 So kickoff, I'll wash and so we'll try some buffing.
01:41 So, this is my half-dozen inch random orbit sander. I've had this for a long fourth dimension. I've sanded a lot of decks and done all kinds of woodworking with it, but it actually is a superb auto polishing tool, as well, if you take the correct kind of pad. Then, this is a cream polishing pad. Information technology'southward got a threaded shaft that goes into the machine, only like the sanding pad would. I got this and the rubbing chemical compound on Amazon, pretty convenient. And so, I've moistened the pad, and I take put on some of the rubbing compound. I've turned down the speed, as well, you don't want it to operate at total rpm. I'm gonna start it fairly tiresome, and so I'll just outset buffing here.
02:24 The van is a petty bit wet. This is a wet process, so I wanna keep it lubed with water and allow'southward see if this works.
03:00 Well, I think that things are happening here. I know information technology's not completely gone, withal, simply allow's but see what nosotros take. And I don't … In that location is something that's definitely going through the pigment hither. Just if you retrieve, there used to exist some marks upwardly here. These are a lot less than they used to be, same with down here.
03:27 So, I'm gonna continue buffing and just come across how good I can go that. While I'yard at it, I'm gonna vitrify a few other places on the van, also, that have gotten the clear glaze scuffed a little bit. Only this is a perfect example of how a piddling chip of TLC can actually brand a difference. And I'thou gonna proceed, and and so evidence you the result when I get it every bit good as I can become it.
03:51 Well, I'm very pleased with what's happened here. Information technology's … The buffing that I … Delight excuse those crows in the groundwork. The buffing approach I've used has worked very well. This is just great. There'south no need for painting. There are a couple of spots, maybe I'll get at that a little bit more than. Downwardly here, too, there was some actual impairment. That looks worse close upwards than it does from a distance, merely I'1000 non shooting for perfection hither, but this is close enough. I think it'll be but fine.
04:36 While I'm at it, I also polished this headlight lens using the same rubbing compound. There's a finer form than this, only I find that this works pretty well for almost things. This, I've just finished and compare it to this one. Information technology's got a petty water on it, simply it is definitely cloudier. It only took me almost five minutes to catechumen this cloudy lens to this much clearer lens using the buffing compound on that random orbit sander with the annoying pad.
++++++++++++++++++
Polyurethane Finish Q&A
Q: Can I buff a used table that has a pretty good finish? There are minor scratches that you lot can see, with a few that can be felt with your fingernail. Aught deep, just a couple of nicks through the finish that I'd planned to touch upward with Polyshades. And then, can I buff as yous described, minus the 320 grit on the cream cake? I accept a half dozen″ orbital polisher to work with. Lord, how I'd wish I'd known of buffing years ago. Always spent hours trying to get that perfect result. Sprayed a coffee table couple of years ago merely got a little overspray of varnish. Can I buff that now, too?
A: I'd definitely start by coloring the pocket-sized scratches with Polyshades as you planned. Later that, practice some gentle buffing and run across what happens. I think you'll be pleased. And yous're right. No sanding with 320, just gentle buffing. You don't know how thick the existing finish is, so accept it easy.
As for your java table, yes, it'southward definitely a candidate for buffing, fifty-fifty now. Use the 320-grit newspaper on a foam block to knock off the dust bumps, the go at information technology with a "fine" 3M rubbing pad. That'll give you a prissy, matte finish. A little work with the "super fine" will bring up a gloss. The more you apply it, the shinier things go. But it's not like the shine of gloss urethane, which I always find goopy and bad looking. A buffed gloss is a much more than refined shine. I hope this helps. Please let me know how y'all brand out.
Did you observe this info useful? Please consider helping me out with content production and hosting costs by "buying me a coffee". Cheers!

Source: https://baileylineroad.com/flawlessly-finish-wood-with-correct-sanding-power-tool/
Posted by: gonzalezaustens.blogspot.com
0 Response to "How To Clean Between Coats Of Polyurethane"
Post a Comment